
Want to make a juicy, perfectly seared steak in the comfort of your own home? Our experts will demonstrate how to grill steak and share a foolproof recipe with you. If you ever have overcooked a steak by accident, you’re not alone. We once cooked a steak so well-done that we couldn’t cut it with a steak knife. It was like cutting through a stack of denim! Fortunately, such errors are easy to learn from. It taught us the value of using a meat thermometer and selecting the appropriate steak for the job.
We also realized that grilling a steak over extremely high heat wasn’t the only way to prepare it. Starting slowly and finishing hot results in a crispy steak on the outside and juicy on the inside. We’ll show you how to grill steak perfectly for the best dinners.
How to Grill Steak?
Ingredients:
- 1 tbsp garlic powder
- One teaspoon paprika
- 2 tsp. dried ground thyme
- Two teaspoons of dried oregano, ground
- 1 1/2 teaspoons black pepper
- One kosher salt teaspoon
- One teaspoon of seasoning (lemon pepper)
- One teaspoon of cayenne pepper
- One teaspoon of red pepper flakes, crushed
- Four beef steaks (1-1/2-inch thick)
You’ll Need These Tools
A thermometer is the best way to determine when your steak is done cooking. We use an instant-read thermometer for thinner steaks, and for thicker steaks, we use a leave-in probe thermometer.
A sturdy pair of long-handled tongs is also required for most grilling activities. They allow you to grip and flip the steak without piercing it, allowing you to keep all of the delicious steak juices inside.
To carve the steak, you’ll also need a sharp knife. A dull knife will not bite into the surface of the steak, which can be dangerous if the knife slips while carving. While carving or boning knives are available, a standard chef’s knife will suffice here.
Instructions
Step 1: Season the steak ahead of time.
Because steak is naturally flavorful, you don’t need to use our spice blend. You can use your favorite spice blend instead of salt and pepper. Keep salt in the mix at all times; salt tenderizes the meat and allows the other seasonings to penetrate deeper into the steak.
Combine the seasonings in a small bowl and season the steaks, coating all sides and pressing the spices into the meat to help them adhere. Chill the steaks for at least one hour and up to 24 hours, uncovered.
Step 2: Pat the steaks dry and allow them to come to room temperature.
Remove the steaks from the refrigerator 30 minutes to an hour before cooking. Blot them dry with paper towels, leaving as much seasoning as possible. Allow the meat to come to room temperature for up to an hour before cooking it.
This is an important step! Taking the chill off the steak promotes even cooking and, more effectively, steaks with a dry surface sear. You’ll get a perfectly cooked steak with a gorgeous crust when you combine them.
Step 3: Preheat the grill and get ready to cook.
Preheat a two-zone gas or charcoal grill on high heat. On the grill, this allows you to have a direct and indirect heat zone. (Learn more about the differences between direct and indirect heat.)
Clean and grease the rack after the grill has been preheated. Cover the grill and place the steaks on the indirect heat side. Starting on low heat allows the steak to cook slowly, preventing the surface from drying out and burning before the interior reaches the desired temperature. Flip the steak halfway through cooking (when it reaches about 80°F) to ensure even cooking on both sides.
Tip: The time required for this step depends entirely on your grill’s temperature. If you don’t have a meat thermometer, cook the steak over medium-high heat and follow the timing guidelines in the steak doneness chart below.
Step 4: Preheat the steak over high heat.
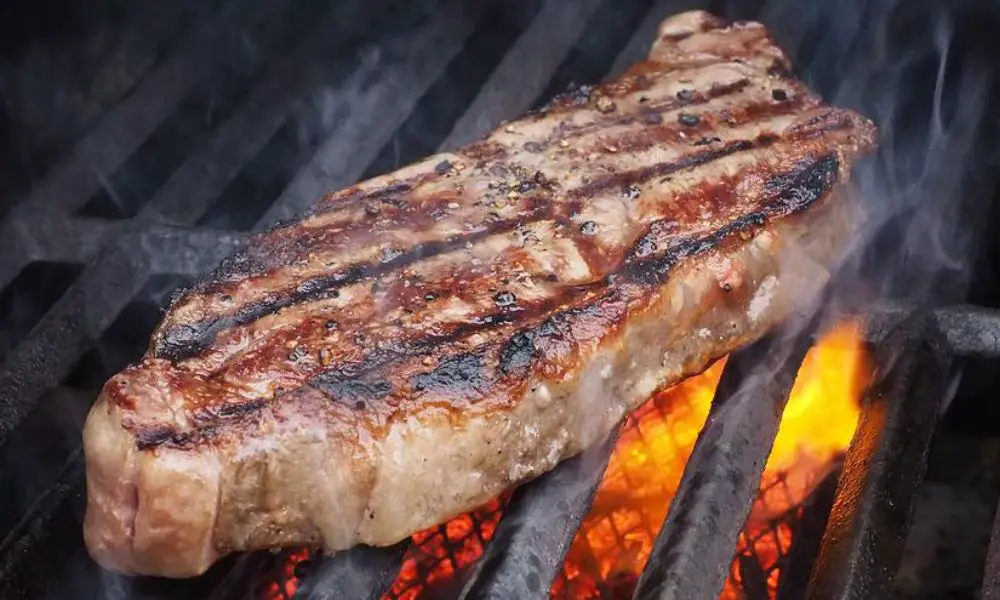
Move the steaks to the direct heat side when the meat reaches 110°F. Cook the meat until it reaches the desired level of doneness. To achieve a golden-brown, crisp exterior, flip the steak frequently.
We’ve all heard that you should only flip steaks once, but you don’t want perfect crosshatched grill marks. If you brown the steak all over and flip it a few times, it will taste better (and cook more evenly).
How to Tell if your Steak is Cooked?
Most steaks are ideal when cooked to medium-rare temperatures, but everyone tastes differently. An instant-read thermometer is the best way to determine when your steak is done. Pull the steak off the grill when it’s five degrees below the desired temperature — carryover cooking will occur, and you’ll earn those extra five degrees as the steak rests.
If you don’t have a thermometer, cook the steak directly over medium-high heat. For 1 to 1-1/2 inch thick steaks, use the estimated timing below. (Preparing a thicker steak? We’ll show you how to do it!)
- 2 to 3 minutes per side, or 120 to 125°F for rare (cool, red center).
- 4 to 5 minutes per side, or 130 to 135°F for medium-rare (warm, red center).
- 5 to 7 minutes per side, or 140 to 145°F for medium (warm, pink center).
- 7 to 9 minutes per side, or 150 to 155°F for medium-well (hot, slightly pink center).
- 9 to 12 minutes per side, or 160 to 165°F for well done (brown all the way through).
Step 5: Allow resting before slicing your delicious grilled steak.
Place the steaks on a plate or cutting board and set aside for at least 5 minutes before slicing. This ensures that the juices remain within the meat rather than spilling out onto the cutting board. After the steak has rested, slice it against the grain and serve with one of these delectable veggie sides.
How to Serve a Steak?
After allowing the steak to rest for at least five minutes, you must decide whether or not to slice it. You can serve the whole steak with a knife and allow the diner to cut it themselves. We frequently prefer to slice the steak before serving it. This allows you to portion one steak to multiple eaters, lowering the cost of dinner while concealing that each person did not receive their steak. It also ensures that the meat is sliced against the grain, resulting in the juiciest, tender bite.
Look for long strands of muscle fibers running parallel to each other to identify the grain. Position your knife in a “T” to the fibers, making perpendicular slices to the grain. Then, serve the steak with a delectable side dish. If desired, drizzle the slices with your favorite steak sauce; garlic butter or chimichurri are always good options.
Grilled Steak Storage
If you have any leftovers, store them in an airtight container or tightly wrap the steak in plastic. It should keep in the fridge for two to three days. There are several methods for reheating leftover steak to keep it juicy and tender: microwave, oven, or in a skillet with a little beef broth.
Steak Buying Guidelines
When choosing the best steak to grill, there are many options to consider. When you know what to look for, finding a steak that fits your budget is simple.
Steaks with or without bones?
Both are delicious, but they cook slightly differently. Boneless meat cooks faster, and the poke test makes it easier to determine the level of doneness. Because the bone insulates the meat and helps the steak retain moisture, bone-in steaks are slightly juicier. However, the meat next to the bone cooks more slowly, so use a thermometer for these steaks.
The Best Grilling Steaks
Grilled beef tenderloin, ribeye, New York strip, porterhouse, or T-bone steaks are all delicious. Tenderloin of beef (also known as fillet mignon) is naturally tender but is also the most expensive, and this cut is excellent for kabobs but not for steak dinner. Because of its lack of fat, the fillet dries out faster on the grill than more forgiving, marbled cuts like ribeye, New York strip, porterhouse, or T-bone.
If you’re looking for cheap steaks, try top sirloin or tri-tip from the short loin. They have less marbling but a beefier flavor. Plate cuts (flank or skirt steak) are also excellent for grilling. Remember that these steaks have more muscle fibers, so marinate them for 8 to 24 hours before grilling.
The Worst Grilling Steaks
Avoid any tough cuts such as round, chuck, or brisket. They don’t hold up well to high-temperature grilling and will become tough and chewy. Cooking these cuts at low and slow braising or smoking temperatures is far superior.
Grades of Beef Quality
In addition to the name of the steak, there is a USDA grading on the beef.
Prime cuts are the best in quality and marbling, but they are also the most expensive.
Choice beef is typically our most cost-effective option. It won’t be as juicy as Prime cuts, but it’ll be delicious and flavorful and ideal for practicing how to grill steak.
We avoid using Select beef on the grill. Because it has the least fat and marbling, it can easily dry out and taste subpar.
What Thickness should my Steak have?
The thickness of a steak is important for more than just portion control. It isn’t easy to achieve the desired contrast between exterior and interior without a sufficiently thick steak. Even over the hottest fire you can muster, very thin steaks tend to overcook before developing a nice crust.
We aim for steaks at least an inch and a half thick, if not two. This means that each steak will weigh between 12 ounces and a pound, which is substantial even for someone with a voracious appetite for red meat. But keep in mind that cooking one large steak for every two people is preferable to cooking two smaller steaks. Discover how to share.
Should I Buy Pre-Cut Steaks or Make my Own?
Purchasing a whole strip loin not only saves money on expensive steaks (at Costco, for example, we can find Prime grade New York strip loins for less than half the price of purchasing individual steaks from Whole Foods or another supermarket that carries Prime meat), but it also gives you more control over your final product, allowing you to manage the thickness of each steak as well as the size of the fat cap.
All you need is a sharp chef’s knife or boning knife and some basic butchering skills.
A whole strip can cost between 10 and 15 pounds and yield between 10 and 20 steaks, depending on how thick you like them (I recommend going at least an inch and a half). After you’ve cut your steaks, vacuum seal them or place them in freezer bags and freeze them for up to a couple of months.
How Much Seasoning should I Use on my Steak?
Quite a bit! We will only season a thick steak on the outside, so use enough salt to carry the flavor through. I always have trouble describing how much salt to use, but my best description is the appearance of a light snow flurry on a dark asphalt parking lot. Not completely white, but with just enough salt to make it visible.
I also keep a high-quality coarse sea salt on the table, such as Maldon or fleur-de-sel, to serve with the steak, sprinkling it on the interior of individual slices as I eat.
Is there Anything Else I should do to Prepare my Steak?
Yes! The most important thing you can do to improve your steak is to leave it uncovered on a rack in the fridge for at least overnight and up to a few nights. This is not “dry-aging,” as some would have you believe, but rather a completely different goal: drying out the exterior. In the early stages of cooking, most energy is spent converting surface moisture to steam. Without that surface moisture, your steak will brown much faster, resulting in less overcooked meat beneath the surface.
Conclusion
Grilling steak can be intimidating, especially when everyone has a different opinion on how we should cook it (medium rare!). However, we guarantee that it is easier and faster than grilling chicken. We hope you enjoyed our above method for perfectly grilling your steak. So Grill Your Steak And Enjoy!