
If you want to learn how to boil egg for dyeing, you can start by reading our article. In it, we’ll cover the mistakes you shouldn’t make, check if the egg is cooked enough, and how to store hard-boiled eggs. If your family enjoys decorating, playing games, and eating colored eggs, remember that they are delicate foods and should be handled with care. Because the egg’s shell is its first line of protection, holding eggs gently will help to prevent cracking. Cracked eggs should not be decorated or consumed.
Easter crafts are the sweetest of all holidays. While there is no shortage of inventive DIY decoration ideas, we always look forward to coloring Easter eggs. Let us share our key advice for the best Easter eggs ever with you so that you may ensure that this Easter is as egg-cellent as possible. This advice includes the ever-critical instruction on swiftly and conveniently boiling eggs for Easter crafts. We’ll cover how to boil eggs in water for various dyes. You’ll also learn to avoid damaging your eggs during the boiling process.
How to Boil Egg for Dyeing?
Wash your hands with warm water and soap before handling raw eggs and after each stage of egg preparation since raw eggs may contain Salmonella or other pathogens. That includes when they are heated, cooled, dyed, and even hidden for games. While hard-boiling eggs should destroy any Salmonella germs, it won’t prevent them from going bad or becoming infected again. Here are the steps to Hard-Boil Egg for Dyeing:
- Eggs should be arranged in a single layer in a saucepan to be hard-cooked.
- At least 1 inch of cold water should be added above the eggs.
- Turn off the heat after bringing the water to a boil while covered.
- For large eggs, please leave them in hot water covered for 15 minutes, for medium, for 12 minutes, and extra large for 18 minutes.
- Run cold water over the eggs right away; once they’ve cooled, drain and put them in the fridge.
This method of cooking eggs results in less of a green tint around the yolk, fewer cracks, and simpler peeling. Aging eggs in the refrigerator for a week to ten days before hard frying is another suggestion for lowering egg peeling frustration.
After being prepared, hard-boiled eggs should be consumed within a week. Use only food-safe coloring and chilled, hard-cooked eggs when decorating the eggs. Think of dying some eggs, one color for the egg hunt or decoration and another for eating.
Best Way to Dye Boiled Eggs
Our useful guide to Easter egg decorations will let you color Easter eggs while having joy with the kids. Our recipe uses ingredients you probably already have in your kitchen, negating the need for pre-made kits from the shop. Grab some McCormick food coloring from the rainbow of colors available to make the color of your dreams, along with a dozen eggs and some vinegar.
Are you looking for design ideas? Explore our more detailed tutorial on how to color Easter eggs to uncover a huge selection of Easter egg designs to try yourself. This spring activity is sure to please, whether you use the eggs to make deviled eggs, decorate your home for spring, or host an Easter egg hunt.
Ingredients Required for Dyeing
- One dozen large eggs
- vinegar
- Assorted Food Color & Egg Dye
- Neon Assorted Food Color & Egg Dye, four count
Instructions
- Eggs should be gently placed in a single layer in a large saucepan. Give the eggs an inch of cold water’s worth of coverage. Cover. On high heat, could you bring it to a quick boil? Get rid of the heat. Observe for 12 minutes. (Adjust the time by three minutes for each larger or smaller size.
- Eggs should be quickly chilled under cold water or placed in ice water until cooled after removing them from the hot water.
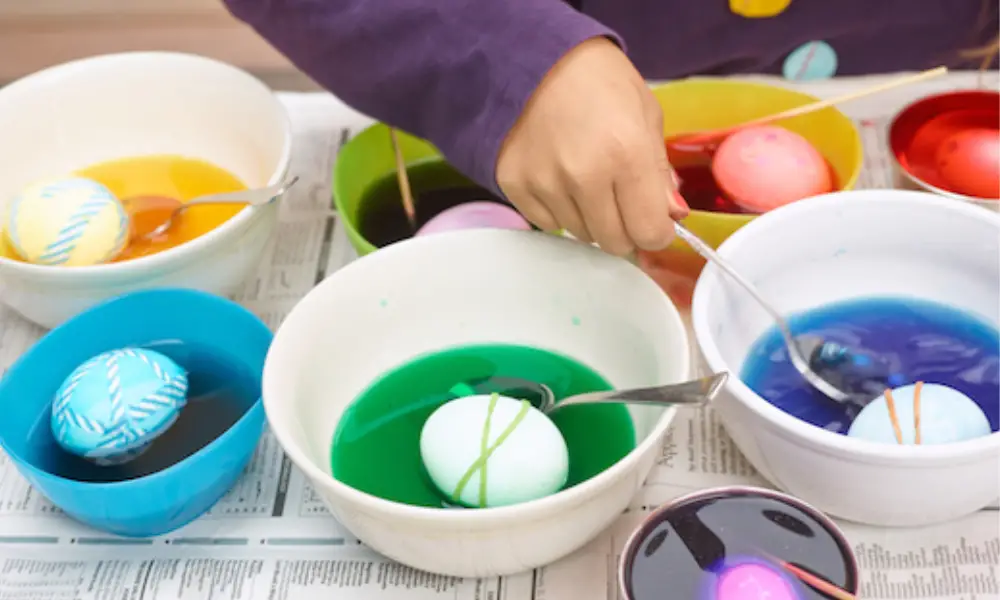
- To create desired hues, combine 1/2 cup boiling water, one teaspoon vinegar, and 10 to 20 drops of food color in a cup. For each color, repeat. For around five minutes, dip hard-cooked eggs in the dye. To add and remove eggs from the paint, use a slotted spoon, a wire egg holder, or tongs. Let the eggs dry.
How to Store Hard-Boiled Eggs?
If you plan to dye your eggs, store them in the refrigerator. Hard-boiled eggs should be used within a week. When not used, hard-cooked eggs should be kept in the fridge before dyeing. Eggs should never be removed from the refrigerator for longer than two hours.
Hard-boiled eggs will spoil faster than fresh eggs, and storing them in the fridge is important. You can peel them after they have cooled down, but you should not peel them until you are ready to use them. You can store hard-boiled eggs in a covered container in the refrigerator. Alternatively, you can use a food container such as Glad Entrée.
The protective coating on the eggshell will also be removed during the cooking process, so they should be kept refrigerated after washing. Before dyeing them, use a food-safe dye. Peel, slice them carefully, and place them on a bed of ice to cool. Once the eggs are cool, store them in the refrigerator for up to a week.
Problems with Boiling Eggs for Dyeing
One of the most common problems with boiling eggs for dyeing is cracked shells. When eggs are overcooked, the shells crack and leak the egg’s yolk and white. This happens because the water is heated too quickly, and the eggshells expand.
When hard-boiled eggs, they should be refrigerated and stored in a cool place. To minimize the chances of cracked shells, bring the eggs to room temperature before boiling them. You can also soak the eggs in hot water for a few minutes to speed up the process.
As the eggshells contain Salmonella bacteria, hard boiling is not sufficient to protect the eggs from spoiling. Once the dye has been applied, it should be stored in a refrigerator. This method is only effective if the paint is food-safe.
Tests to Determine if an Egg is Done
It’s time to dye your eggs! You can perform a few easy tests to see if your eggs are ready for dyeing. If you have a few on hand, you can do this test with as few as two eggs. You need water, a cup or a bowl, and an egg. Fill the water to the egg’s top; it should cover it. If the water does not, the egg is not ready to die.
To determine if an egg is finished dyeing, gently place the unfertilized table egg in water. If it floats, it is too old. Aging eggs have larger air pockets that make them float. However, this test is only a rough guide and can’t tell if an egg is bad. There are several other tests you can try.
The Test on Egg Whites:
This test is a good option if you intend to crack the egg before frying it or include it in a recipe for baked goods. Look closely at the egg white’s consistency after bursting it onto a plate or flat surface. It should be somewhat opaque, not too spread out, and thick and slightly sticky.
A runny, transparent, and watery yolk indicates that the egg is no longer fresh. This is because the egg white degrades and becomes liquid as it ages. The yolk will also appear to have a somewhat flat top rather than spherical.
1. Sniff Testing:
Whether the sulfur smell is related to eggs, it is frequently referred to as “rotten eggs.” That’s because rotten eggs give off a potent sulfur odor.
You might be able to smell the egg through the shell if it’s beyond its prime, but if you’re worried about freshness, take a whiff after you shatter it.
2. Whether to Use or Discard:
You should discard your egg if it fails any of these tests. You can still use an egg exhibiting signs of aging but not ready to be thrown out.
Older eggs are best for hard boiling because the larger air cell creates more space between the egg and the shell, which makes the egg simpler to peel.
3. Suitable Egg Storage:
Eggs should be kept in their original carton in the refrigerator. The wrapping shields the eggs from breakage and helps keep out smells and odors from other items in the fridge. You can also refer to the date imprinted on the box as a guide.
The egg’s larger end should always face up since the yolk is more likely to deteriorate than the white one, and this posture retains the air cell at the top, limiting the likelihood that harmful germs may enter the yolk. For prolonged storage, eggs can also be frozen.
4. Keep Eggs Cold Before Dyeing:
One of the most enjoyable Easter traditions is dying boiled eggs. Before you begin, make sure your eggs are chilled overnight. This will prevent any bacteria from growing on them, which is especially important for the dyestuffs.
To prepare the dye, prepare a small bowl filled with water and add ten to twenty drops of food coloring per color. Add the eggs and allow them to soak for at least five minutes until they have turned a rich shade of green, blue, or yellow.
To prevent bacteria from growing on your eggs, hard-cooking them kills the Salmonella bacteria but doesn’t stop them from spoiling or getting contaminated. To prevent this, keep the eggs in the refrigerator before dyeing them. Store the dyed eggs in the fridge for at least two hours and eat them within a day or two. Depending on the food-safe dye, your eggs will remain fresh for up to a week.
Overcooking Eggs:
If you’re planning to use egg whites for dying, there are a few things you need to know. Eggs should be at room temperature when you begin to boil them.
Place the eggs in a pot with one inch of water and bring them to a boil. Once boiling, cover the eggs and bring them to a simmer. Bring the water to a boil quickly; if you cook them slowly, it will be overcooked. When cooking them, you should be careful not to break the shells.
When Dyeing Eggs, Use Only food-Safe Dyes:
While hard-boiled eggs kill Salmonella bacteria, they won’t spoil the eggs. It’s also best to refrigerate them after coloring them. You can also use them for cooking and eating. If you’re dyeing eggs for another purpose, brown eggs have a deeper, richer color. For best results, use food-safe dyes.
What Mistakes should you Avoid to Make Hard-Boiled Eggs for Dyeing?
When boiling eggs for dyeing, you should avoid a few mistakes. For starters, you shouldn’t add cold eggs to a pot of boiling water. Overcrowding the pot with eggs can also cause cracked shells. Although cracked eggs can be dyed successfully, a smooth surface is better for a successful dyeing process. Here are some tips to help you avoid these mistakes:
- Hard-cooked eggs should be refrigerated and stored when not in use.
- You should only use food-safe dyes for decorating eggs.
- When using chemical paint, use a high-quality food-safe lacquer.
- When hard-cooking eggs, use cold water and refrigerate them until they are ready for coloring.
- You should also use cold water at least one inch above the eggs.
- When boiling eggs for dyeing, ensure that the water is at least 165°F.
How do you Boil Eggs for Easter Dyeing without Cracking them?
It might be challenging to boil eggs without the shells cracking. When eggs are cold, they are more likely to break when they come into contact with boiling water.
They may also fail if they collide with one another or fall to the bottom of the pot. You must handle your eggs delicately, cook them slowly, and keep a constant eye on the temperature difference between the egg and the water to prevent cracking.
How Long do Refrigerator-Stored Hard-Boiled Eggs Last?
Although all kinds of eggs are perishable, did you know that hard-cooked eggs degrade more quickly than fresh eggs? Deviled eggs, which are only kept for about two days in the refrigerator, are a case in point.
You do, however, have a bit more freedom if you don’t want to devil your eggs. Boiled eggs can be stored in the refrigerator for about a week.
How to Cook Eggs in the Oven, Hard-Boiled?
- The oven should be heated to 325°F.
- Fill each cup of a muffin or cupcake pan with one egg.
- Just enough water should be added to each cup to fill it.
- For 30 minutes, bake.
- Immediately remove the eggs from the muffin tin and place them in an ice bath for five minutes.
How to Make Hard-Boiled Eggs for Dyeing with an Air Fryer?
Yes! You can make hard-boiled eggs in an air fryer by following the steps.
- Put the eggs in the pan in your basket or the air fryer basket.
- The food should be cooked for 14 minutes at 250°F.
- Remove it right away, then spend five minutes in an ice bath.
Conclusion
Eggs should be handled carefully. Cracked eggs shouldn’t be used or eaten. Hard-boiled eggs kill Salmonella. It won’t prevent them from becoming worse or reinfecting. Taking uncooked eggs requires warm water and soap. Before dying, hard-boiled eggs should be eaten. Decorate eggs with food-safe dye and chilled hard-cooked eggs—aging eggs for a week to ten days before hard frying might reduce egg peeling frustration. Aged eggs should be dyed.
Hard-boiled eggs kill Salmonella, yet they still deteriorate. A few simple methods can tell if an egg is ready to dye. Chill eggs overnight before dying to avoid bacteria growth. Refrigerate colored eggs for two hours and consume them within two days. Overcrowding the pot causes fractured shells. When not used, refrigerate hard-cooked eggs. Egg dyes should be food-safe.