
You can learn to sear the chicken to prepare a quick supper. You can also use this technique to bake chicken after it’s been seared. This will help seal in the moisture and flavor inside the meat and keep it from drying out. To learn how to sear chicken, follow these steps: Prepare the oil and heat a skillet over medium-high heat. Place the chicken into the skillet and do not touch it for 5 minutes. When released from the pan, you can place a lid over it for the final 2 minutes of cooking.
Heat your pan to medium-high. When cooking chicken, make sure to brown it on all sides. This will add to the appearance of your meal and make it taste better. Be careful not to overcook your chicken. Cover the chicken with foil before it’s fully cooked to prevent overcooking. This will lock in the moisture and flavor. You can also cook the chicken breasts whole or in slices. Once the chicken is room temperature, use two tablespoons of oil to heat a skillet over medium-high heat.
It is essential to brown the chicken during cooking, as this will enhance the appearance of the food. During baking, you should cover the chicken with aluminum foil to not dry out. Then, place the chicken in the oven to cook until the internal temperature is 165 degrees Fahrenheit. After the initial searing, you can also bake the dish.
What Does Searing Chicken Mean?
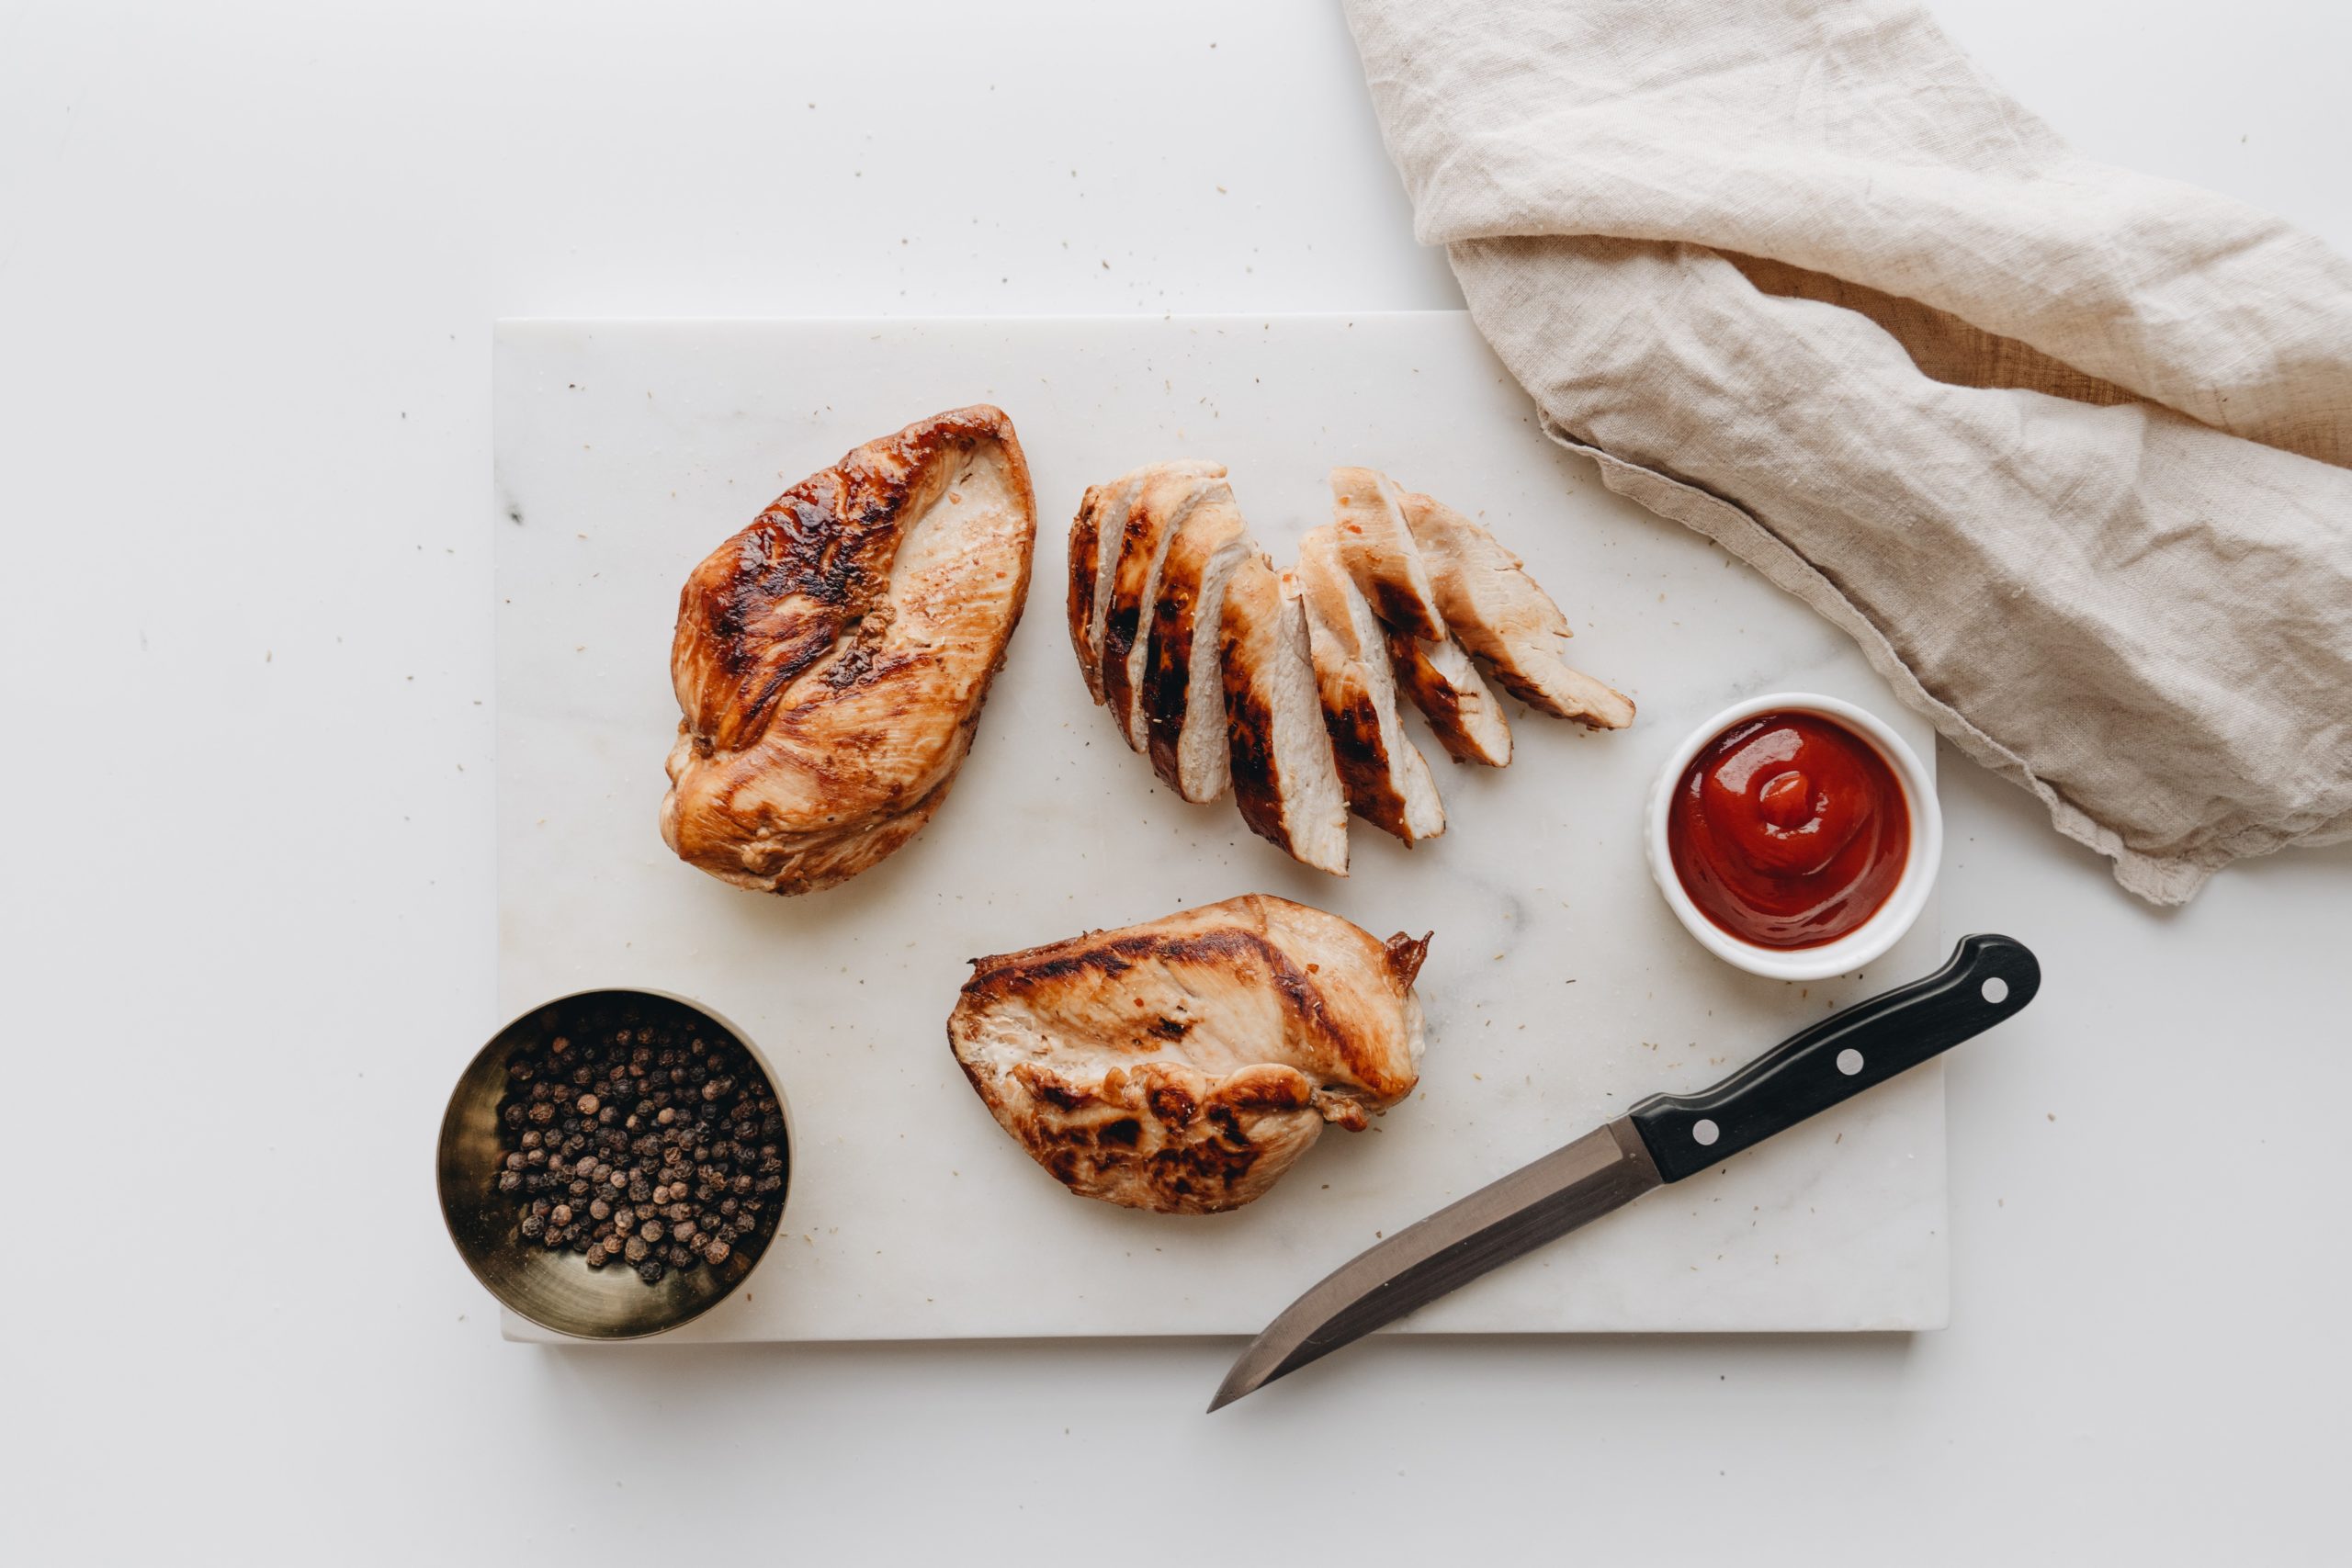
Cooking chicken at a high temperature in a hot pan until a golden-brown crust forms on the surface is called sear. This is done with oil to ensure that the surface of the chicken’sears’ uniformly and without sticking. Searing chicken and other meats create a delectable appearance and flavor while also sealing in liquids. If you want your chicken to have a crisp crust on the outside, you may cook it this way for a quick entree or before baking it in the oven.
What Is The Best Way To Cook Seared Chicken Breast?
Follow the below tips for perfectly searing the chicken:
- First and foremost, boneless and skinless chicken breasts will be used.
- Using a paper towel, pat dries the chicken breasts. Because the less water on the surface to begin with, the more quickly the chicken browns, starting with a dry chicken surface yields a moister result.
- Don’t be afraid to season them generously with salt, pepper, paprika, red pepper flakes, and Italian seasoning to get a lot of flavors.
- Allow the meat to rest for 5 to 10 minutes after seasoning. Salting causes muscle fibers to break down, shrinking less and retaining more juices as they cook.
- Stainless steel skillets or cast iron pans are excellent heat conductors ideal for searing chicken.
- Searing is best done over medium-high heat with the correct oil, such as vegetable, olive, canola, or peanut oil.
- Before adding the chicken, make sure the skillet is hot. Heat 1 tablespoon olive oil in your skillet (you may also use vegetable oil or cooking spray) over medium-high heat. Place your chicken in the hot pan, emphasizing the word “hot.” When the chicken comes into contact with the pan, it should sizzle.
- As the chicken cooks, resist the impulse to move it around. The sear will not be disrupted if the chicken remains in the same spot in the skillet. When the chicken is ready, it will detach itself from the surface, and it’s not done scorching if it’s sticking to the pan a lot.
- Only flip the bird once. Cook for 4-5 minutes on the first side to get a good brown color, then turn and cook for another 4-5 minutes.
How Should The Chicken Be Seasoned?
For the chicken to brown and not accumulate moisture, you’ll need large stainless steel or cast-iron skillet. All liquids evaporate fast in a large pan, resulting in a lovely sear. Before adding the chicken, the skillet must be hot, and you should hear a sizzle when the chicken reaches the pan. This dry herb and spice blend gives a unique zest to any chicken dish, with just the right amount of heat and flavor to keep your guests coming back for more.

Don’t be daunted by the extensive list. Most of it is spices you will probably have in your cupboard, and it also adds an excellent taste to chili without adding too much heat. In practically every chicken recipe, I use Italian spice, paprika, red pepper flakes, salt, and pepper. These ingredients add the ideal flavor to a chicken breast that would otherwise be bland. To make it more interesting, you can add some of your favorite spices, such as taco seasoning or chili pepper.
Sear Chicken Tips and Tricks
Chicken is arguably the most adaptable meat. It has a broad cultural appeal, goes well with almost any sauce, flavor, or side dish, and maybe served in various ways. Despite the seemingly unlimited variations, the ideal final product is usually crispy and golden-brown on the outside with juicy and tender chicken on the inside. The secret is the cooking procedure and a few simple tricks for consistently golden-brown perfection.
1. Searing
Pan searing exposes foods to high heat for a limited period to brown their surface and create a delectable crust on the outside. A heavy-bottomed pan, such as cast iron, works best for searing since it retains heat effectively and can be moved from burner to oven if necessary. Use a high-heat frying oil like canola to keep the chicken from sticking to the pan.
Chicken tenders, boneless chicken breasts, and thighs benefit from searing (boneless, skinless, or otherwise). When working with skin-on cuts, sear the chicken skin-side down until golden brown. Allow the chicken to come to room temperature before beginning to remove some of the chills from the refrigerator. This will ensure that it cooks evenly and has a superior sear. Begin by heating a tiny amount of cooking oil in a heated pan over medium-high heat.
Season the chicken with salt and pepper and place it in the pan. Allow the meat to cook on one side for several minutes before turning. When a chicken cutlet releases easily from the pan and has a gorgeous golden-brown sear, it’s ready to flip. When an instant-read thermometer reads 165°F at the thickest part of the cut, it’s done. Transfer the skillet to a 350°F oven to continue cooking the chicken if it isn’t cooked through when the sear has developed.
2. Roasting
Roasting a whole chicken is frequently the preferred preparation method, but it’s also a terrific alternative for portioned slices. When roasting chicken, use a low-sided baking sheet or roasting pan because the open design allows air to circulate the chicken, resulting in crisp skin. Cover a baking sheet with foil and place a wire rack on top.
Consider dry-brining skin-on slices a day or two ahead of time for extra crispy skin (or at least eight hours before cooking). Meat that has been salted before cooking loses moisture during cooking, resulting in crispier skin. Use one-half to three-quarters of a teaspoon of kosher salt per pound of chicken when pre-salting. Refrigerate the chicken uncovered on a wire rack on a rimmed baking sheet.
Transfer your roasting pan to the oven while it’s preheating to get a good sear on the underside of the chicken. To prevent sticking, drizzle a little oil into the bottom of the prepared pan, then carefully add the seasoned chicken and place the pan in the oven’s top third. Preheat your oven to 425°F and keep a tight check on the bird for a classic roasted chicken with golden-brown skin.
Reduce the oven temperature and plan for a longer cooking time if the skin color is too rapid. Turn your oven’s broiler on during the last few minutes of cooking for additional crispy skin, but be careful not to burn the skin or overcook the bird. Insert an instant-read thermometer between the breast and leg into the thickest part of the thigh when cooking a complete chicken. When the thermometer reads 165°F, the chicken is done roasting.
3. Grilling
Before starting on the gas grill or lighting the charcoals, give your grill gates a quick cleaning. Then, for at least 10 minutes, preheat the grill to high heat and brush the grates to remove any dirt. Temperature control is critical from here. Use two heat zones for more oversized items that require longer grilling times (such a whole chicken and dark meats like drumsticks and thighs), one for scorching and rapid cooking and the other for slower, more even cooking. If a cut begins to overcook, move it to an indirect heat zone.
Start by scorching the chicken skin-side down over the direct heat zone if you’re grilling a butterflied chicken or bone-in, skin-on leg quarters, thighs, or drumsticks (sear drumsticks on all sides). Then, with the bone-side down, shift the cut to the indirect heat zone to complete cooking to 165°F. Boneless, skinless breasts, tenderloins, and thighs, which require less time on the grill, will spend most of their time (if not all) over direct heat (about 400°F). Basting and sauces should be saved for the conclusion of the cooking process, as the sugar in most sauces can cause the chicken to burn.
Chicken Searing Without Drying It
Cooking chicken to an internal temperature of 165F for white pieces and 175F for darker meat, which is easy to measure with a meat thermometer, is best to keep it from drying out.
The second best method is to cut the chicken at a uniform thickness all around. The most significant cuts of chicken are butterflied chicken breasts or slices of chicken with an even thickness, such as chicken thighs.
Because it’s half the thickness of a chicken breast, a butterflied chicken breast cooks evenly from end to end and considerably faster than a chicken breast.
You can rapidly butterfly chicken breasts, and it’s well worth the extra effort because it results in juicy chicken that cooks quickly.
How Long, Does Searing Chicken Take?
For searing chicken breasts, sear the first side for 5 to 6 minutes on the pan, undisturbed, and then the opposite side for 3 to 5 minutes.
Cooking time will be reduced if you use butterflied chicken breasts or boneless, skinless thighs. 3-4 minutes on one side and 3 minutes on the other.
Cooking times will always vary depending on the thickness of the meat, which is why utilizing the internal temperature of the meat as a guide for doneness is always the best option. Once all sides are browned, and the juices run clear, the internal temperature is examined.
How Do You Know When The Seared Chicken Is Ready?
When the internal temperature of seared chicken reaches 165°F for chicken breasts and 175°F for chicken thighs, it is ready. The exteriors of both surfaces should be a uniform golden brown color. You don’t need to cook the chicken as long if you’re baking it after it’s been seared; you’ll flip it once it’s easy to lift from the pan. When an instant-read thermometer reads 165°F at the thickest part of the cut, it’s done. Transfer the skillet to a 350°F oven to continue cooking the chicken if it isn’t cooked through when the sear has developed. Place your thermometer in the thickest section of the bird (for a whole chicken, that would be the breast). When a thermometer reads 180°F (82°C) for a whole chicken or 165°F (74°C) for chicken parts, you know it’s done.
When cooking chicken, use a heavy-bottomed skillet. This will distribute the heat evenly, which will result in a golden exterior. Try not to move the chicken around too much while cooking, as it can get dry. If you prefer the taste of a sauce over the texture of your chicken, you can cook it in the oven. It will have a crust and be tender if the chicken is done. For best results, you should always cook the meat at room temperature, removing it from the refrigerator before cooking.
During cooking, use a heavy-bottomed skillet. This will keep the heat in the pan and will help to ensure that your chicken is cooked through. The key is to avoid constant flipping because it will dry it out. Make sure that the pan is heavy enough to transfer from the stove to the oven during the cooking process. It is also essential to use high-heat cooking oil to prevent sticking. When cooking chicken, you should also make sure it’s at room temperature.
Conclusion
After removing the skin, you should cook the chicken on medium-high heat. It should be well-browned on the outside and should not be overcooked. It is also essential to keep the chicken covered while it’s cooking. When the chicken is cooked, make sure it is at room temperature. If the chicken is frozen, you should remove it from the refrigerator. If you’re not satisfied with the results of your first attempt, it’s time to try a different method. It would help if you chose a heavy-bottomed skillet for your searing.