
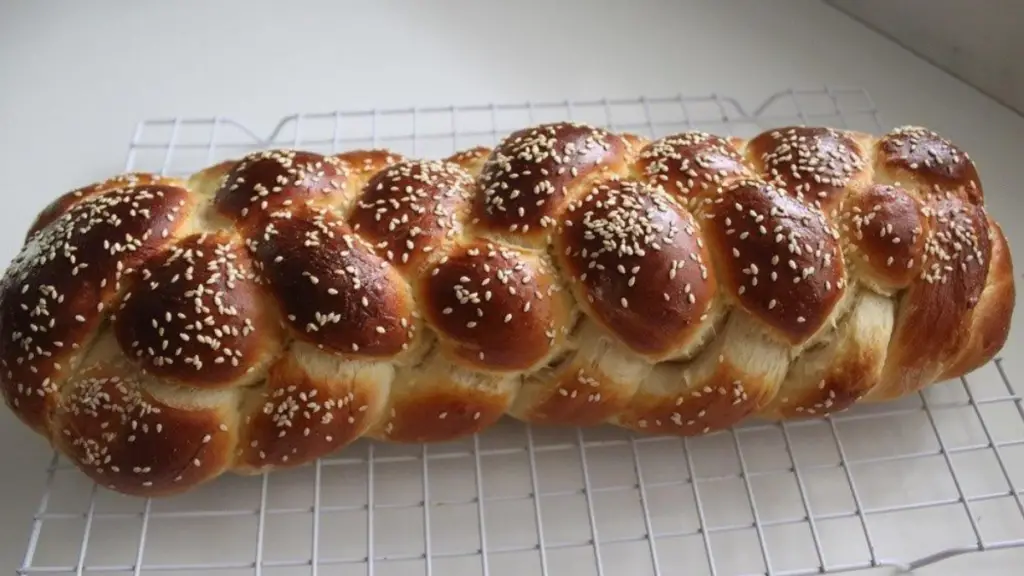
When making Challah, a well-designed recipe will yield the most delicious results. There are many types of Challah, and they can vary widely in their shapes and sizes. The most popular shape of Challah is braided, which can have two, three, four, or six strands. Each length of braid represents a different type of Challah. Begin by placing the strands lengthwise on a counter. Bring the outside right strand into the bottom four strands. Repeat this process until you have braided your Challah.
A traditional challah recipe is simple and quick to prepare. The dough is prepared by mixing 7 cups with sugar and salt. Then, the remaining ingredients are mixed in, and the dough is left to rise. The dough is then brushed with egg wash before baking. A beautiful loaf of Challah can be served as a festive meal or enjoyed as a snack. You will surely enjoy this delicious, comforting bread any time of year.
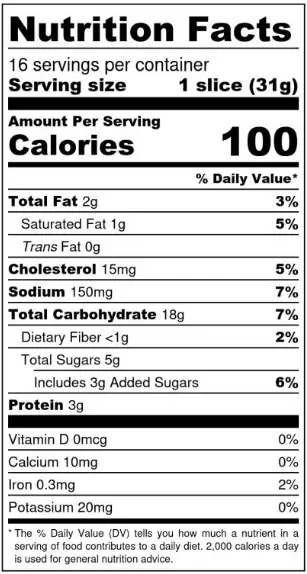
Challah Nutrition Facts
What is Exactly Challah?
Challah is a special Ashkenazi Jewish bread braided and served on ceremonial occasions such as Shabbat and major Jewish holidays (other than Passover). A ritually acceptable Challah is made from dough with a small portion set aside as an offering. The dough offering is also known as Challah. Hallah is how non-Ashkenazi Jews refer to bread on Shabbat. The word comes from the Bible, but it initially only referred to the dough offering. Braided pieces of bread like kalach and vánoka can be found all over Eastern Europe.
How to Make Challah Bread Recipe?
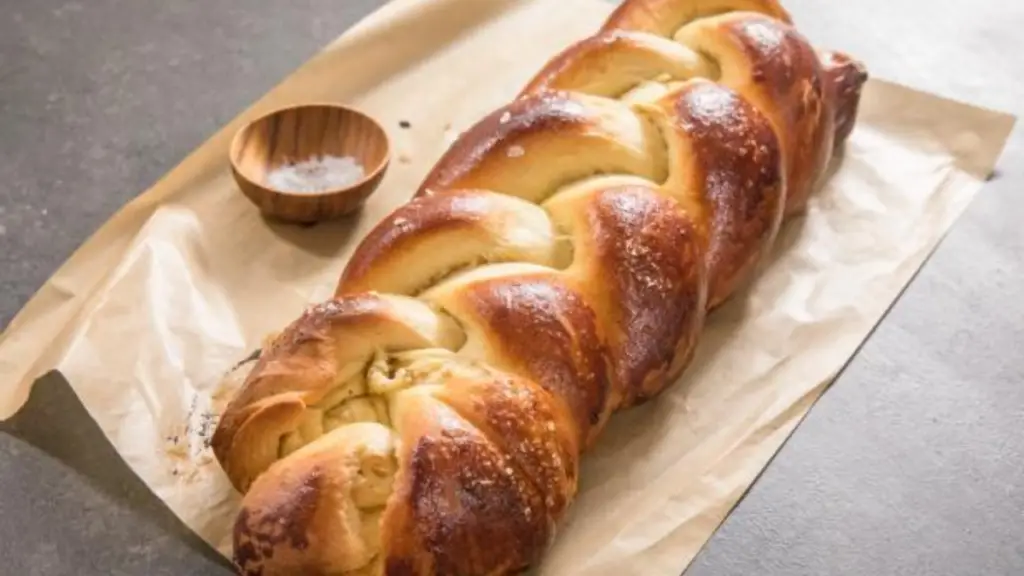
It is a bread that is as pleasing to the eye as it is to the palate. Look at the braiding! Challah is a bread that everyone should know how to make.
Ingredients
- 1 cup lukewarm water
- Two teaspoons of active dry or instant yeast
- 4 to 4 1/2 cups of all-purpose flour
- 1/4 cup granulated sugar
- Two teaspoons salt
- Two large eggs
- One large egg yolk (reserve the whites for the egg wash)
- 1/4 cup neutral-flavored vegetable oil, such as canola
Instructions
- Make the yeast dissolve. In a small mixing bowl, combine the water, yeast, and a pinch of sugar, and stir to combine. Allow 5 to 10 minutes for a thin frothy layer to form across the top. This indicates that the yeast is alive and well. (If you don’t see this or your yeast won’t dissolve, it’s probably expired, and you’ll need to buy new yeast.
- Toss together the dry ingredients. Whisk together 4 cups of flour, sugar, and salt in an electric stand mixer bowl. (Alternatively, knead by hand in a large bowl.)
- Combine the eggs, yolk, and oil in a bowl. Make a well in the center of the flour and add the eggs, egg yolk, and oil. Pull a little flour from the sides of the bowl as you whisk to make a slurry.
- To make a shaggy dough, mix everything. Over the egg slurry, pour the yeast mixture. With a wooden spoon or rubber spatula, combine the yeast, eggs, and flour until a shaggy dough forms that are difficult to mix.
- Knead the dough for approximately 6 to 8 minutes. Fit the hook attachment to the mixer and knead on low speed for 6 to 8 minutes. (Alternatively, knead the dough by hand for about 10 minutes on a floured work surface.) If the dough is too sticky, add a teaspoon of flour until it is tacky but not bubblegum-like. When the dough is soft, smooth, and holds a ball shape, it has finished kneading.
- Allow the dough to double in size. Put the dough in an oiled bowl, wrap it in plastic wrap, and keep it warm. Allow 1 1/2 to 2 hours for the dough to double in size.
- Roll the dough into ropes after dividing it. Depending on the braid you want to do, divide the dough into 3 or 6 equal pieces. Make a long rope out of each piece of dough, about 16 inches long. If the ropes shrink as you roll them, set them aside for 5 minutes to allow the gluten to relax before continuing.
- Braid the dough together. At the very top, gather the ropes and squeeze them together. If you’re making a 3-stranded challah, braid the ropes together like hair or yarn, then squeeze the other ends together. The directions for making 6-stranded Challah are listed below.
- Allow for the Challah to rise. Using parchment paper, line a baking sheet. Sprinkle the braided loaf with flour and place it on top. Using a clean kitchen towel, cover the dish. Allow 1 hour to rise in a warm, draft-free location until puffy and pillowy.
- Brush the egg white on the Challah. Preheat the oven to 350°F and place a rack in the middle about 20 minutes before baking. Brush the reserved egg white with one tablespoon of water and brush it all over the Challah when ready to bake. Make a point of getting into the cracks and down the sides of the loaf.
- 30–35 minutes to bake the Challah Bake for 30 to 35 minutes, rotating the baking sheet halfway through, or until the Challah is deeply browned and an instant-read thermometer reads 190°F in the center.
- Let the Challah cool. Cool the Challah on a cooling rack until it is just warm. Cut and eat.
How to Store Challah?
To extend the shelf life of challah bread, there are several options. It depends on how quickly you intend to consume it:
- If you plan to eat the Challah within 2-7 days: Seal the Challah in an air-tight ziplock or bread bag. Make sure all the air has been pushed out so you can retain the moisture in the bread. Keep at room temperature for up to 7 days.
- If you plan to eat the bread in the next week – to 3 months: Freeze your Challah. First, wrap the Challah in a layer of plastic wrap, making sure all parts of the bread are sealed. Then, place the Challah in an air-tight ziplock or bread bag. Keep in the freezer for up to 3 months.
Make homemade Challah, so be sure the loaf or rolls have thoroughly cooled before sealing the bread.
How to Reheat Challah Bread?
There are a few ways to reheat challah bread:
- If your challah bread is frozen, defrost the Challah by removing it from the freezer and placing it on the counter at room temperature (leave it wrapped). The challah bread should begin to thaw and soften within a couple of hours. Then, choose one of the reheating methods below.
- Reheat in the microwave: If you prefer a soft, moist piece of Challah, use this method! Wet a paper towel until it is slightly damp (you don’t want it dripping water). Next, wrap the paper towel around the slice or loaf of Challah. Microwave for 30 – 60 seconds on high until the bread is soft and warm to the touch.
- Reheat in the toaster oven: If you prefer a slightly crunchy, toasty piece of Challah, use this method! Simply
What Not to do?
There are a few things you’ll want to avoid when storing your challah bread:
- Do not refrigerate challah bread. Many home cooks believe the fridge extends the life of bread, and this is a myth. Refrigeration promotes staling of the bread.
- Do not loosely wrap the Challah. We want to preserve the moisture in the Challah and to do so, we need to wrap the bread tightly.
- Do not be tempted to waste Challah. Even if you purchase or bake Challah and realize you can’t eat it right away, don’t be tempted to waste it! Freeze the bread for later using the instructions listed above.
What Makes Challah Bread Different?
Similar to brioche, Challah is a yeast bread enhanced with eggs. The most significant distinction between Challah and brioche bread dough is that brioche has a lot of butter, whereas Challah contains oil.
The flavor is reminiscent of brioche bread. Because of the egg yolks, the texture is thick and spongy, with a hint of sharpness from the honey. To put it that way, it’s a little soft, sweet, and a lot tasty.
Olive oil gives the bread a rich, earthy flavor that adds complexity without masking the eggy sweetness that makes Challah so delicious. The use of olive oil makes Challah especially fitting for Hanukkah, which commemorates an oleaginous miracle.
Difference Between Challah and Brioche
The similarities between Challah and brioche are striking. Both loaves, for instance, are bathed in eggs to give them a black surface and a sweet flavor. Both loaves will also be divided into parts and reorganized before baking.
The distinction is that Challah will be braided, while brioche will be put in rows in a bread pan. Furthermore, brioche is substantially sweeter than Challah, even though both forms of bread are sweeter than usual. Honey is frequently used in the production of Challah; thus, it has a subtle honey flavor. Because of its Jewish heritage, Challah contains fewer ingredients and does not contain any dairy. As a result, brioche is frequently thought to be creamier and flakier than Challah. The addition of more eggs in Challah results in orange inside, whereas brioche is ordinarily white.
Conclusion
While making challah bread is a simple and quick process, some recipe variations may require special flour or equipment. Although some challah recipes call for bread flour, all-purpose flour works just as well. Challah recipes are simple and quick to make, and they don’t require a stand mixer. They do, however, take some time, but the results are well worth it! Always set aside Challah to rest until it becomes easier to handle.
Raisins can also be added to the dough. Depending on the recipe, you can add one or two tablespoons of raisins when rolling. This way, you can have a beautiful Passover challah bread. Remove the egg after the Challah has risen and sprinkle it with sesame seeds. The bread should rest at room temperature for at least two hours after this process before baking.